'비교 수업'에서 비교 연산의 결과로 참(true)이나 거짓(false)을 얻을 수 있다고 배웠다. 불린은 조건문에서 핵심적인 역할을 담당하는데 이 불린 값을 기준으로 실행 흐름을 제어하기 때문이다.
조건문
조건문이란 주어진 조건에 따라서 애플리케이션을 다르게 동작하도록 하는 것으로 프로그래밍의 핵심 중의 하나라고 할 수 있다.
조건문의 문법
프로그래밍에서 문(文, Statements)은 문법적인 완결성을 가진 하나의 완제품이라고 할 수 있다. if문, for문, while문등이 여기에 해당한다. 절(節마디절, clause)은 문(statements)를 구성하고 있는 부품이라고 할 수 있다. 곧 배우게 된다. 물론 이러한 문법적인 개념은 이해를 돕기 위한 것일 뿐 암기해야 할 것은 전혀 아니다.
if
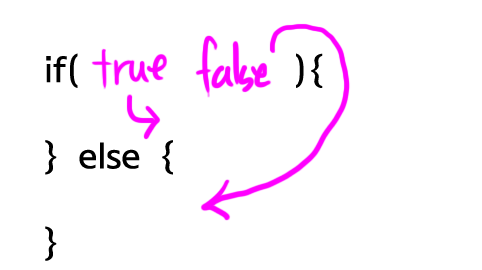
조건문은 if로 시작한다. 아래 그림을 보자. if 뒤의 괄호를 if절이라고 부르고, 중괄호가 감싸고 있는 구간을 then 절이라고 부르겠다. 조건문에서는 if 절의 값이 true일 때 then 절이 실행된다. if 절이 false이면 then 절은 실행되지 않는다.

아래 예제의 실행결과는 'result : true'다. if 뒤에 True가 왔기 때문이다. 아래의 실행 결과는 화면에 result : true를 출력한다. (실행)
1 2 3 4 5 6 7 8 9 10 11 | package org.opentutorials.javatutorials.condition;public class Condition1Demo { public static void main(String[] args) { if(true){ System.out.println("result : true"); } }} |
다음 예제는 아무것도 출력하지 않을 것이다. if절이 false이기 때문이다.
1 2 3 | if(false){ System.out.println("result : true");} |
다음 예제를 보자. 결과는 12345를 출력할 것이다. (실행)
1 2 3 4 5 6 7 8 9 10 11 12 13 14 15 | package org.opentutorials.javatutorials.condition;public class Condition2Demo { public static void main(String[] args) { if (true) { System.out.println(1); System.out.println(2); System.out.println(3); System.out.println(4); } System.out.println(5); }} |
다음 예제를 실행해보자. 결과는 5만 출력될 것이다. (실행)
1 2 3 4 5 6 7 | if(false){ System.out.println(1); System.out.println(2); System.out.println(3); System.out.println(4);}System.out.println(5); |
else
if만으로는 좀 더 복잡한 상황을 처리하는데 부족하다. 아래의 그림처럼 if-else절은 if 절의 값이 true일 때 then절이 실행되고, false일 때 else절이 실행된다.

아래 예제를 보자. 결과는 1이다. (실행)
1 2 3 4 5 6 7 8 9 10 11 12 13 14 | package org.opentutorials.javatutorials.condition;public class Condition3Demo { public static void main(String[] args) { if (true) { System.out.println(1); } else { System.out.println(2); } }} |
다음 예제의 결과는 2다. (실행)
1 2 3 4 5 | if(false){ System.out.println(1);} else { System.out.println(2);} |
else if
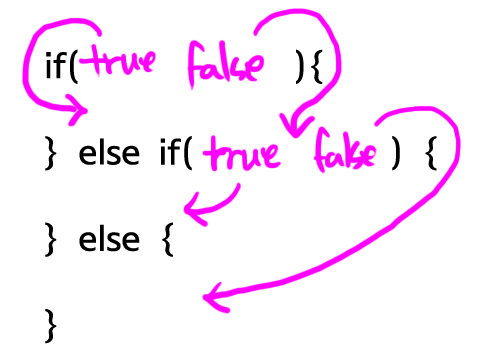
else if절을 이용하면 조건문의 흐름을 좀 더 자유롭게 제어할 수 있다. if절의 값이 true라면 then절이 실행된다. false라면 else if절로 제어가 넘어간다. else if절의 값이 true라면 else if then절이 실행된다. false라면 else 절이 실행된다. else if절은 여러 개가 복수로 등장할 수 있고, else절은 생략이 가능하다. else 절이 else if 절보다 먼저 등장할 수는 없다.

아래 예제를 보자. 결과는 2다. (실행)
1 2 3 4 5 6 7 8 9 10 11 12 13 14 15 16 17 18 | package org.opentutorials.javatutorials.condition;public class ElseDemo { public static void main(String[] args) { if (false) { System.out.println(1); } else if (true) { System.out.println(2); } else if (true) { System.out.println(3); } else { System.out.println(4); } }} |
다음 예제의 결과는 3이다. (실행)
1 2 3 4 5 6 7 8 9 | if(false){ System.out.println(1);} else if(false) { System.out.println(2);} else if(true) { System.out.println(3);} else { System.out.println(4);} |
다음 예제의 결과는 4다. (실행)
1 2 3 4 5 6 7 8 9 | if(false){ System.out.println(1);} else if(false) { System.out.println(2);} else if(false) { System.out.println(3);} else { System.out.println(4);} |
변수와 비교연산자 그리고 조건문
지금까지 배운 부품들을 결합해서 작은 프로그램을 만들어보자. 예제에서 사용할 부품은 변수, 비교연산자, 조건문이다. 사용자가 입력한 아이디 값을 체크하는 프로그램을 만들어 볼 것이다. ID의 값으로 egoing을 입력해보고, 다른 값도 입력해보자.
1 2 3 4 5 6 7 8 9 10 11 12 | package org.opentutorials.javatutorials.condition;public class LoginDemo { public static void main(String[] args) { String id = args[0]; if(id.equals("egoing")){ System.out.println("right"); } else { System.out.println("wrong"); } }} |
위의 프로그램을 실행하기 위해서는 조금 새로운 방법을 사용해야 한다. 파일을 컴파일한 후에 실행할 때 아래와 같이 입력한다.
1 | java LoginDemo egoing |
egoing은 Java 앱인 LoginDemo의 입력 값이다. 이 값은 프로그램 내부로 전달된다. 그럼 프로그램에서 이 값을 알아내는 구문은 아래와 같다.
1 | String id = args[0]; |
우린 아직 배열을 배우지 않았다. 따라서 위의 코드가 무엇인지 정확하게 설명하는 것은 지금 단계에서는 불필요하다. args[0]가 첫 번째 입력 값(egoing)을 의미한다고만 이해하자. 위의 코드는 입력 값을 문자열 타입의 변수 id에 담고 있다.
사용자가 입력한 데이터가 egoing과 같은지 비교할 때는 아래와 같이 id.equals("egoing")이라는 구문을 사용한다. equal은 같다는 의미다. 즉 사용자가 입력한 값(id)가 "egoing"인지를 확인하는 것이다. 그 결과가 true라면 right가 출력되고, false라면 wrong가 출력될 것이다.
1 | if(id.equals("egoing")){ |
조건문의 중첩
위의 예제에서 아이디와 비밀번호를 모두 검증해야 한다면 어떻게 하면 될까? 다음 예제를 보자.
1 2 3 4 5 6 7 8 9 10 11 12 13 14 15 16 17 18 | package org.opentutorials.javatutorials.condition;public class LoginDemo2 { public static void main(String[] args) { String id = args[0]; String password = args[1]; if (id.equals("egoing")) { if (password.equals("111111")) { System.out.println("right"); } else { System.out.println("wrong"); } } else { System.out.println("wrong"); } }} |
이 예제는 입력 값을 두 개 받는다. id와 password를 프로그램 내부로 전달하려면 프로그램을 실행할 때 아래와 같이 차례대로 아이디와 비밀번호를 입력하면 된다.
1 | java LoginDemo2 egoing 111111 |
if문 안에 다시 if문이 등장했다. 즉 사용자가 입력한 값과 아이디의 값이 일치하는지를 확인한 후에 일치한다면 비밀번호가 일치하는지 확인한 것이다. 이렇게 조건문은 조건문 안에 중첩적으로 사용될 수 있다.
switch 문
조건문의 대표적인 문법은 if문이다. 사용빈도는 적지만 조건이 많다면 switch문이 로직을 보다 명료하게 보여줄 수 있다. 아래의 코드를 보자.
1 2 3 4 5 6 7 8 9 10 11 12 13 14 15 16 17 18 19 20 21 22 23 24 25 26 27 28 29 30 31 32 33 34 35 36 37 38 39 | package org.opentutorials.javatutorials.condition;public class SwitchDemo { public static void main(String[] args) { System.out.println("switch(1)"); switch(1){ case 1: System.out.println("one"); case 2: System.out.println("two"); case 3: System.out.println("three"); } System.out.println("switch(2)"); switch(2){ case 1: System.out.println("one"); case 2: System.out.println("two"); case 3: System.out.println("three"); } System.out.println("switch(3)"); switch(3){ case 1: System.out.println("one"); case 2: System.out.println("two"); case 3: System.out.println("three"); } }} |
결과는 아래와 같다.
1 2 3 4 5 6 7 8 9 | switch(1)onetwothreeswitch(2)twothreeswitch(3)three |
즉 switch 뒤의 괄호에 숫자로 1이 주어지면 case 1에 해당하는 로직 이후의 모든 case들이 실행된다.
아래와 같이 코드를 바꿔보자.
1 2 3 4 5 6 7 8 9 10 11 12 13 14 15 16 17 18 19 20 21 22 23 24 25 26 27 28 29 30 31 32 33 34 35 36 37 38 39 40 41 42 43 44 45 46 47 48 | package org.opentutorials.javatutorials.condition;public class SwitchDemo { public static void main(String[] args) { System.out.println("switch(1)"); switch(1){ case 1: System.out.println("one"); break; case 2: System.out.println("two"); break; case 3: System.out.println("three"); break; } System.out.println("switch(2)"); switch(2){ case 1: System.out.println("one"); break; case 2: System.out.println("two"); break; case 3: System.out.println("three"); break; } System.out.println("switch(3)"); switch(3){ case 1: System.out.println("one"); break; case 2: System.out.println("two"); break; case 3: System.out.println("three"); break; } }} |
결과는 다음과 같다.
1 2 3 4 5 6 | switch(1)oneswitch(2)twoswitch(3)three |
